
How to host a Ghost blog for free


Today we'll take a look at your options if you plan to get a free hosting for your Ghost blog. Getting a free Ghost blog may be a challenge. There's only a few options available if you're not tech-savy or don't plan to run your own server. You might find this guide useful if you really like Ghost like we do.
Generally you have two options to host a Ghost blog for free:
- Run your own server - using a free tier from AWS, Google Cloud or other providers
- Sign up for a free Ghost hosting platform - get everything set up for you automatically
Ghost hosting platform
With a Ghost hosting platform you get a lot of features for free without having to understand how Ghost or servers work.
A Ghost hosting platform automates all tasks for you - such as:
- Deploy and run a Ghost blog
- Configure Ghost to run on your domain
- Automatically update Ghost to the latest version
- Resolve any issues while you're sleeping 🌙
- Provide storage for your images
- Handle spikes in traffic so that your blog is always available to readers
Ghost platform is really a no hassle option for those who wish to have a good night's sleep and not have to worry about their blog not running.
How to run a free Ghost blog
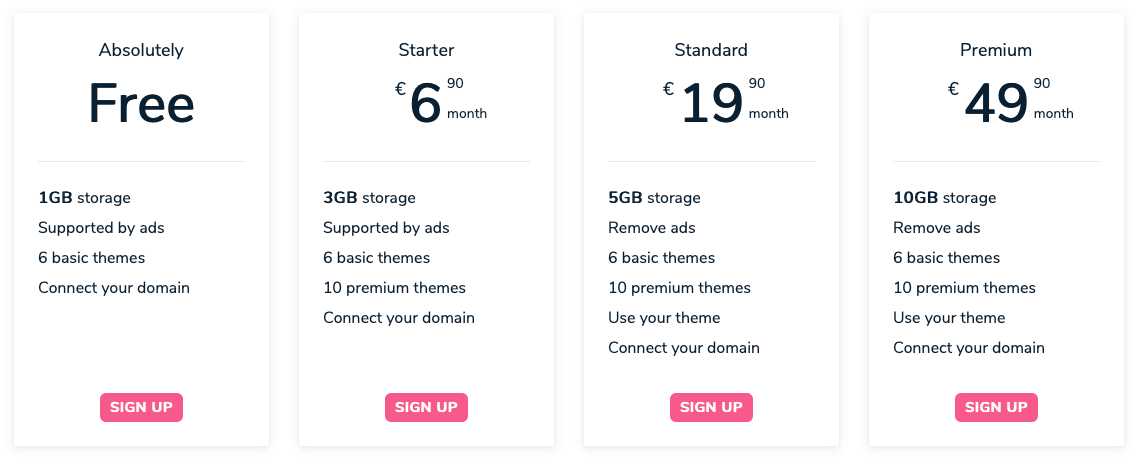
We'll look at DigitalPress which is a free Ghost hosting platform that enables you to run your blog without any costs. Their pricing page shows you get a free blog which is supported by ads, gives you 6 themes and 1GB of storage for images. This is totally sufficient for a small to medium blog site. If you don't like ads you can always upgrade to a paid subscription which remove the ads and provides more customization options.
Let's jump in and see how to sign up for a free Ghost hosting platform at DigitalPress.
First you need to create an account by signing up at admin.digitalpress.blog

Once your account is ready, sign in with your newly created email and password. On the main screen you see an option to create a new site. This way you create a new Ghost blog site which enables you to publish content.

Next pick a name for your Ghost blog site. DigitalPress automatically assigns a subdomain for your blog based on the name of your site. You can share the link with your readers or use it to configure your own domain such as blog.example.com
In our case I picked ghost-tutorial as the name for the site and DigitalPress provided me the subdomain ghost-tutorial.digitalpress.blog which runs my blog.

Your Ghost blog is now running. Let's configure Ghost and publish your first post.
Configuring Ghost blog for the first time
Your Ghost blog is running but needs first-time configuration to create the first user, set the password, set up Blog title, etc.
Open your blog administration interface by clicking the Administrator dashboard link.

This brings you to the Ghost configuration screen. Set up all the required fields and hit Last step: Invite staff users.

The next screen allows you to invite other editors but you can always do it later. We'll skip this step.

Your blog is ready and good to go 👌
Let's jump in to publish your first blog post.
Publish first blog post
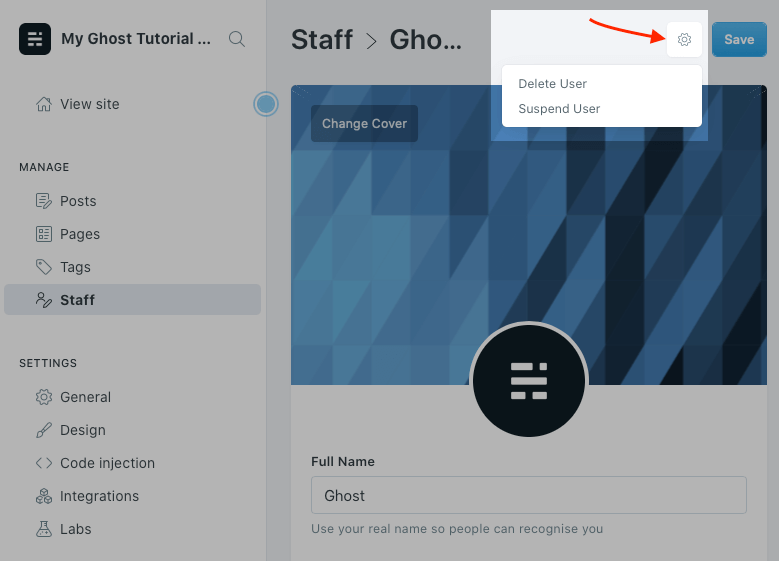
By default all Ghost blogs have a default user and content available for you to read about how to use Ghost, publish posts, manage users, etc. We'll remove this content to have a clear Ghost blog.
Navigate to Staff by using the left navigation. Click on the Ghost user, select settings from the top right corner of the screen and confirm removal of the user. This deletes all user's posts and prepares the site to publish your first blog post.
Now that your blog does not show any default posts, let's create your first post by navigating to Posts in the left navigation and clicking Write a new post button.

Type in a title and content for your post and publish the post by clicking Publish in the top right corner.

Congratulations 🎉 You have just published your first blog post.
Conclusion
We have just learned how to host a Ghost blog for free to publish your first blog post without any coding experience or single line of code. Your blog is up and running and you can start sharing content with your readers.
Stay tuned for more content to learn how to setup Google Analytics or run blog on your own domain.